
HOW TO MAKE BUTTERFLIES FROM PAPER?

Butterflies are colourful, pretty insect. There are so many kind of it, out there. Each butterfly differ in its colour, shape, size, pattern on its wings, habitat, etc,. Everyone loves its exact duplicate for different things like decoration, fake butterflies on plants, kids to play and amuse others, etc., I liked to create butterfly, solely for decoration. You can also use it for decorating your walls, room, personal space, anywhere.

SIMPLE AND MEDIUM
If you are new here, let me explain briefly. I have created butterflies in 3 ways. For namesake I divided them into 3 level :
- Simple
- Medium
- Hard
In the earlier post, I have discussed about Simple and Medium methods with detail instructions.

In case if you are interested in knowing the methods, then here is the link. This medium level one is my personal favourite of part 1. Just click here : Butterflies – Part 1.
HARD / REPLICATE
Actually this level is not that hard as its name says. In this level, I tried to produce the exact duplicate of normal / real butterfly using paper. Any guess of how I made it?

Here I tried to produce the butterflies using “Painting”. In case if you are well versed in drawing then, this is very simple for you. I am not an expert but I love painting. And I just tried to duplicate. Ignore if does not seem like a replicate to you. But I hope you like it.
PAINTINGS
Here I have made butterflies using 2 types of painting.
- Acrylic
- Watercolour

You can also use oil painting for even more neat results. Instead of painting, you can also use Pastels, Crayons, Colour pencils, or whatever you like.
BASIC REQUIREMENTS:
Before jumping into the painting part, let us see its requirements.
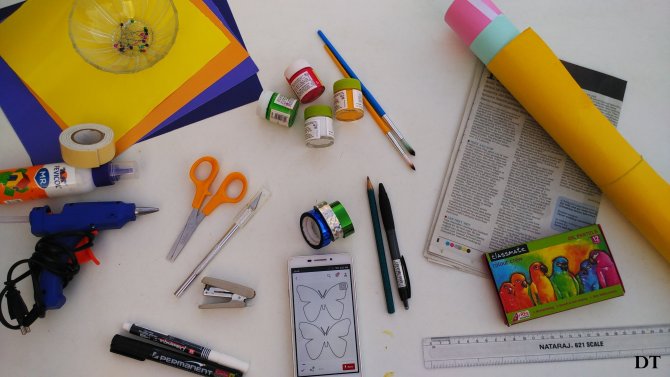
The basic requirements are :
- Chart / watercolour painting paper – papers
- Paint
- Water colour – Faber castell watercolour paints
- Acrylic – Acrylic tubes
- Brushes – Faber castell tri – grip paint brushes
- Pencils – Artline pencils
- Scissors – Godrej scissors
- X-acto knife – precision knife
- Double sided tape – foam tape
- Twine or copper wire – wire
- Ruler – ruler
- Reference image – diarytale page
HOW I MADE THESE BUTTERFLIES?
Here is the detailed instructions on how I made these colourful, pretty butterflies.
REFERENCE IMAGES
Before stepping into making, just take a look on the images of the butterflies on pinterest or google images. You will get an idea of its structure. Also you will choose a butterfly which you find comfortable and easy for you to create.

I used pinterest and google images for reference and have created 10 different types of it. (that includes my creative ones too)
You may not only uses these sources, but also customise it according to your creativity and wish. Because there is no limits in the colours of butterfly. Who knows your creativity can also exists around somewhere. ( as like mine )
HOW I SKETCHED THE OUTLINES?
After finalising your butterfly, now try to draw its outline. Take a plain paper and pencil. You can also take rulers if you want.

STEPS FOR SKETCHING OUTLINES
I started drawing butterflies based on the studies made on them:
# You can draw the reference line as I did.

Hint : Fore – wings of the butterfly will be larger than the hind – wings.
# Every butterfly will have symmetrical wings.
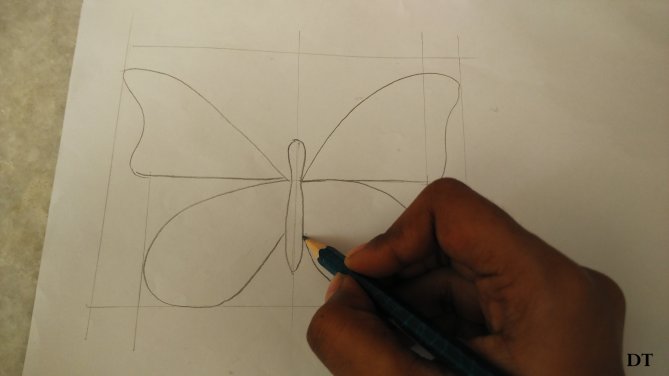
#Almost all the butterflies will have a rounded or elliptical area called BASAL CELLS on it’s each wing.

# Followed by it, veins will appear. You can draw many number of veins as you like.

# These veins will reach up to the wings edges. But make sure you draw at least 3 veins.

# If you find difficulties in drawing the shape of the butterfly, take a cut out you made from earlier post, Simple method, and trace it down to get symmetrical wings.

# The simple method gives the outlines of symmetrical wings. Then draw the pattern on the wings as said before.


# From the base drawings, using the reference image, I had drawn these butterflies.

If you find difficult to draw its outlines, you can also take print-outs and can use it. Simple!
PAINTING / MAIN PART
I made butterflies using watercolour painting and acrylic, to know which gives better results. The thing is, I found, both has same effect. So choose your own way.

WATERCOLOUR PAINTING
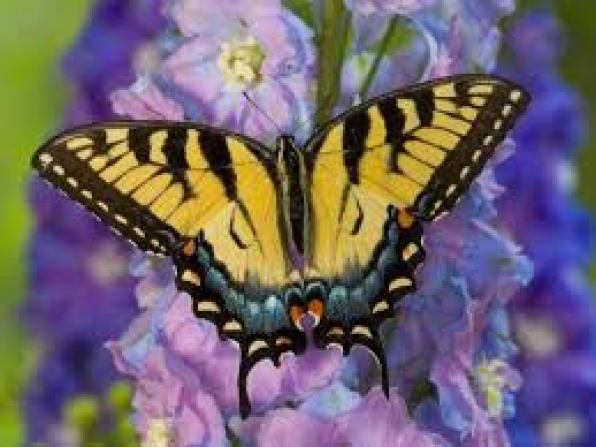
For water-colour painting, I chose swallowtail butterfly as reference. Nothing specific! randomly selected. Here I went with yellow coloured swallowtail butterfly.

Reference images and Outlines
For that we need to draw the outline first. I have selected 2 types of swallowtail butterfly.


Watercolour painting
With the help of the reference images, outlines are drawn and after that, painting part starts. Here is the step-wise painting. You may find least difference between the two butterfly. And it is look alike.


The same procedure is followed for the swallowtail 1 with slight difference in wings pattern.

For more details, I placed the two images next to each other for finding more difference.

ACRYLIC PAINTING
I tried acrylic painting. As the paint dries fast, we need to speed up the painting, or else you will find difficulties in blending. The final results are good enough for me.

Outlines and Reference images
For acrylic painting, I took a plain sheet or white chart. Bright coloured paints and different sized brushes.

I have taken different butterflies as reference and added my idea. After reference and detailed studies, I have drawn the outlines of 9 different ones.

FOCUSING ON EACH BUTTERFLY
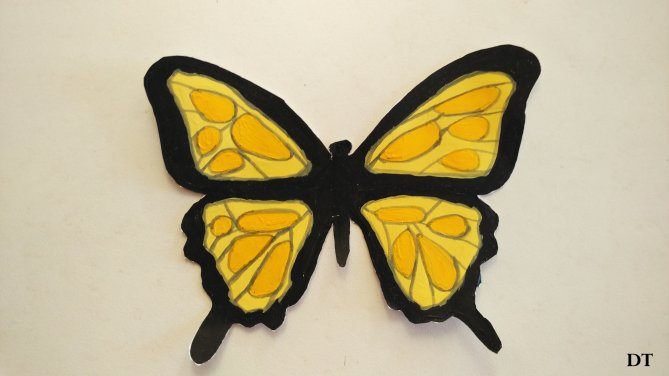
BUTTERFLY 1 : MONARCH BUTTERFLY
For the first butterfly, I chose the famous butterfly, which almost everyone knows it. That is Monarch butterfly.


BUTTERFLY 2 : COMMON LEOPARD / Phalanta phalantha
The next butterfly which I chose was this leopard lacewings or common leopard / spotted rustic butterfly. First I completed painting and then I realised that there is like this kind out there. Just amused!


BUTTERFLY 3 : Papilio ulysses
This butterfly is special to me, as I loved its colour, a bright turquoise blue. And my butterfly is the combination of the following two. Hope my butterfly exists out there.


BUTTERFLY 4:


BUTTERFLY 5, 6 :


BUTTERFLY 7:


BUTTERFLY 8:

BUTTERFLY 9:


OVERALL LOOK


CUTTING THE BUTTERFLIES
On completion of the painting part, now keep down the brush and take the scissors or precision knife, whatever you are comfortable with. Neatly cut the butterflies out.


For more accurate cutting, use X-acto knife. I used it where there is more curves.


DECORATING PART
Decor 1
Now comes the fun part in the whole process. Now I will share the easiest way to decorate your wall. For this you may need a black chart, double sided tape and also a ruler.

Now take the butterfly that is perfectly cut and paste a double sided tape on its back.

Now paste it on the wall randomly. And after pasting, paste the 4 back chart stripes as a frame and trim off the excess.

It brightens up the space. Also remains as the wall decor. We loved it near the basin side, so that every morning we see that.

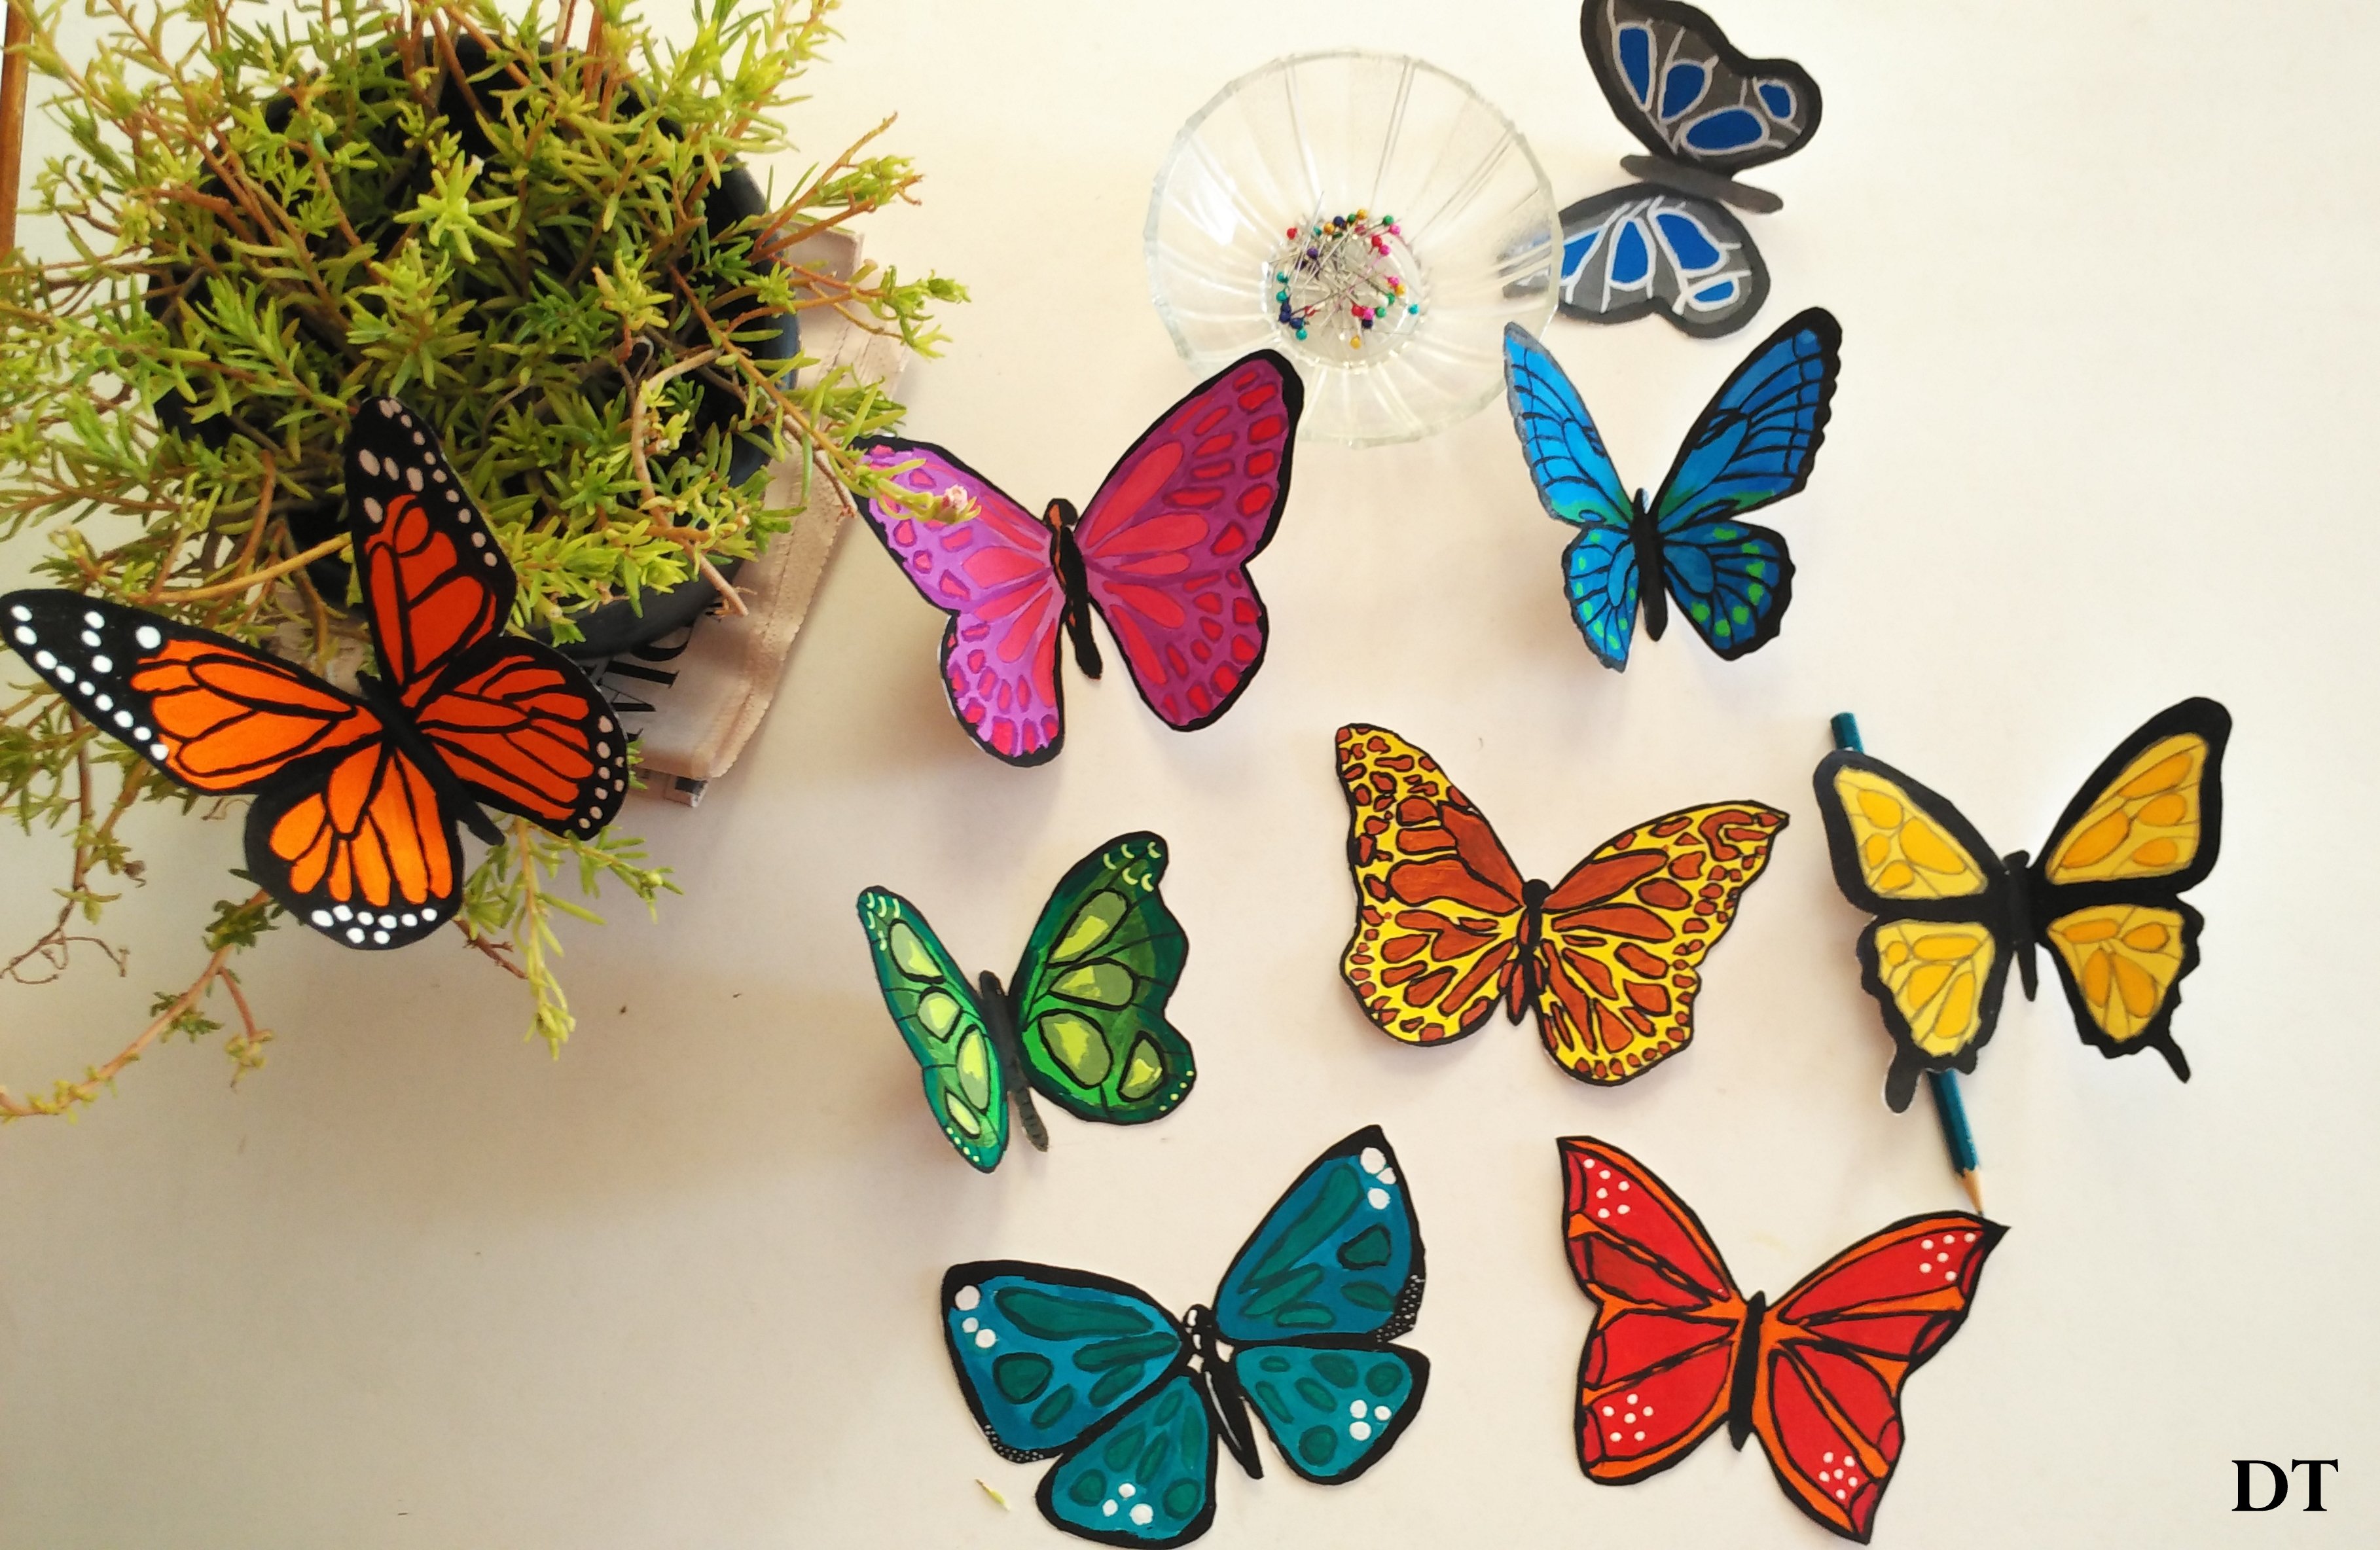
Decor 2
This decor is somewhat, I loved it near me work space. If you have a indoor plants, then you can add these fake butterflies to it. Looks awesome.


Decor 3
You can add it to your wall art. If you are interested in knowing my wall art then click here: Tree.


If you find these decor simple and attractive then comment below which one you like most and why?
FIXING ANTENNAE
Oh god! I almost forgot the antennae part!! Ok let us do it now, before it is too late. I tried to draw and cut from a paper. But it is a great failure, as the paper easily folds and tears apart. So I used thin copper wire to fix it as antennae.


FINAL LOOK


And that is a wrap. I had fun in making these butterflies. If you try it, then make sure you share with us via social media. Also comment below which butterfly you like most.
NOTE :
Moreover, I will post each butterflies in detail on social media. Make sure you follow me there.
- Instagram – @diarytale
- Facebook Page – @diarytale1
- Twitter – @diary_tale
- Google plus – +DiaryTale
- Pinterest – diarytaleDT
*P.S. Thanks for those who showed continuous support via subscription & social media. If you are new here, feel free to subscribe us!
Have a good day!!

Great effort. Impressive artwork. Best wishes.
Thank you so much!@vivasayi
Sooperb
Thanks @Divakar
I think decor -2 is QUITE awesome AND perfectly matched with that plant like a real butterfly… ALL THE BEST FOR UR UPCOMING PROJECTS…
Thank you so much for your support!
Ur ideas are COOL and easy way…… 😘😍 I admire all of it!
😛 @srinithi
Nice 👍🏻 i love the work. I like the decor 2. it is so realistic keep rocking😍❤️
Thanks 🙂 @lawan