
DIY WALL ART – THEME BASED
TREE
Hello friends!
I am here with an interesting and easy wall art idea. Don’t judge me, lately, I am obsessed with this “WALL ART”. But this time with a twist as it is “THEME BASED”. I took up this challenge and tried it for my personal use. I am sharing with you because it is so simple, easy and cheap also it came out with a great look! So why don’t you try? And this post is all about step by step guide for easy DIY wall art of a tree.

Before jumping into the project, let us talk about the benefits, which I experienced.
BENEFITS OF WALL DECORATION WITH ART
- The first thing, I experienced is, the wall became so “bright, attractive and vibrant”, otherwise, it is an old boring wall.
- Next, you can customize your own space with your favorite art. It eventually lifts your mood, when you are down, it brings positivity.
- With wall art, It may not only image, but you can also paint your favorite quotes, that motivates you. In my case, the wall has “FEED YOUR FIRE”. Or simply the words you like.
You can check out my previous post about the random things I liked. – simple wall decor 
This image is a quick view of my previous post of random wall art.
- The BIG thing, you can save money from costly decorative things. Even the stencils are costly ranging from Rs.200 – Rs.5000.
- If you prefer, DIY wall art, then you will feel relaxed.
- Not only Wall art, but any kind of art can also bring peace and sometime may inspire you. You will feel happy in your space.
- TRUST ME, you will find it really FUN to play with colors.
IDEA – THEME BASED
The basic idea of this challenge is, to recreate your boring empty space/wall into bright and happy!

RULES FOR THIS ART CHALLENGE
- Imagine how you want your space to be. Describe in four words minimum.
- Now choose one thing that satisfies all your description.
Example:
- Electrifying
- Loud
- Craziness
- Dynamic
For the above description, you can choose, Guitar, Music player, Tape recorder, Music notes, Piano or anything.
In my case :
- Attractive
- Vibrant
- Natural
- Happy
I found all these in TREE. So I went for a simple tree.
DIY – TREE – WALL ART
DETAILED STORY OF MY WALL ART
I am not a Wall Art expert. Just tried and became obsessed. Now jumping into the story of how to wall art a SIMPLE TREE.

REQUIREMENTS
The basic requirements are

- Paint
- Brushes
- Wall/canvas/anything you prefer.
For this project, I used the following. I hereby enclose links to each product I used, that you may find online in AMAZON.

- PAINT – Fevicryl acrylic paint
- BRUSHES – Faber-castell tri-grip synthetic round brush
- SCISSORS – Godrej: hobby and craft scissors
- X-ACTO KNIFE – precision knife
- DOUBLE SIDED TAPE – a simple double-sided tape
- MARKER – Camlin – black permanent marker
- PENCILS – Artline black beauty pencil
- ERASERS – Apsara nondust erasers.
- Colour papers
- Some rough paper and pen.
PLAN
Before you start, take a rough paper and sketch what you are trying for. Either it is stencils or freehand drawing. If you are using colors, then color your rough plan, as it will help you in choosing colors.

For reference, you can use any image you find perfect. I used Pinterest for my art. As I am not an expert, this planning helped me a bit. Planning beforehand can always avoid mistakes.
STEPS FOR DIY WALL ART – TREE
-
CLEAR / CLEAN THE WALL
Just wipe using a dry cloth or if already have any pictures hanging, clear it. Lay newspapers in the floor below.

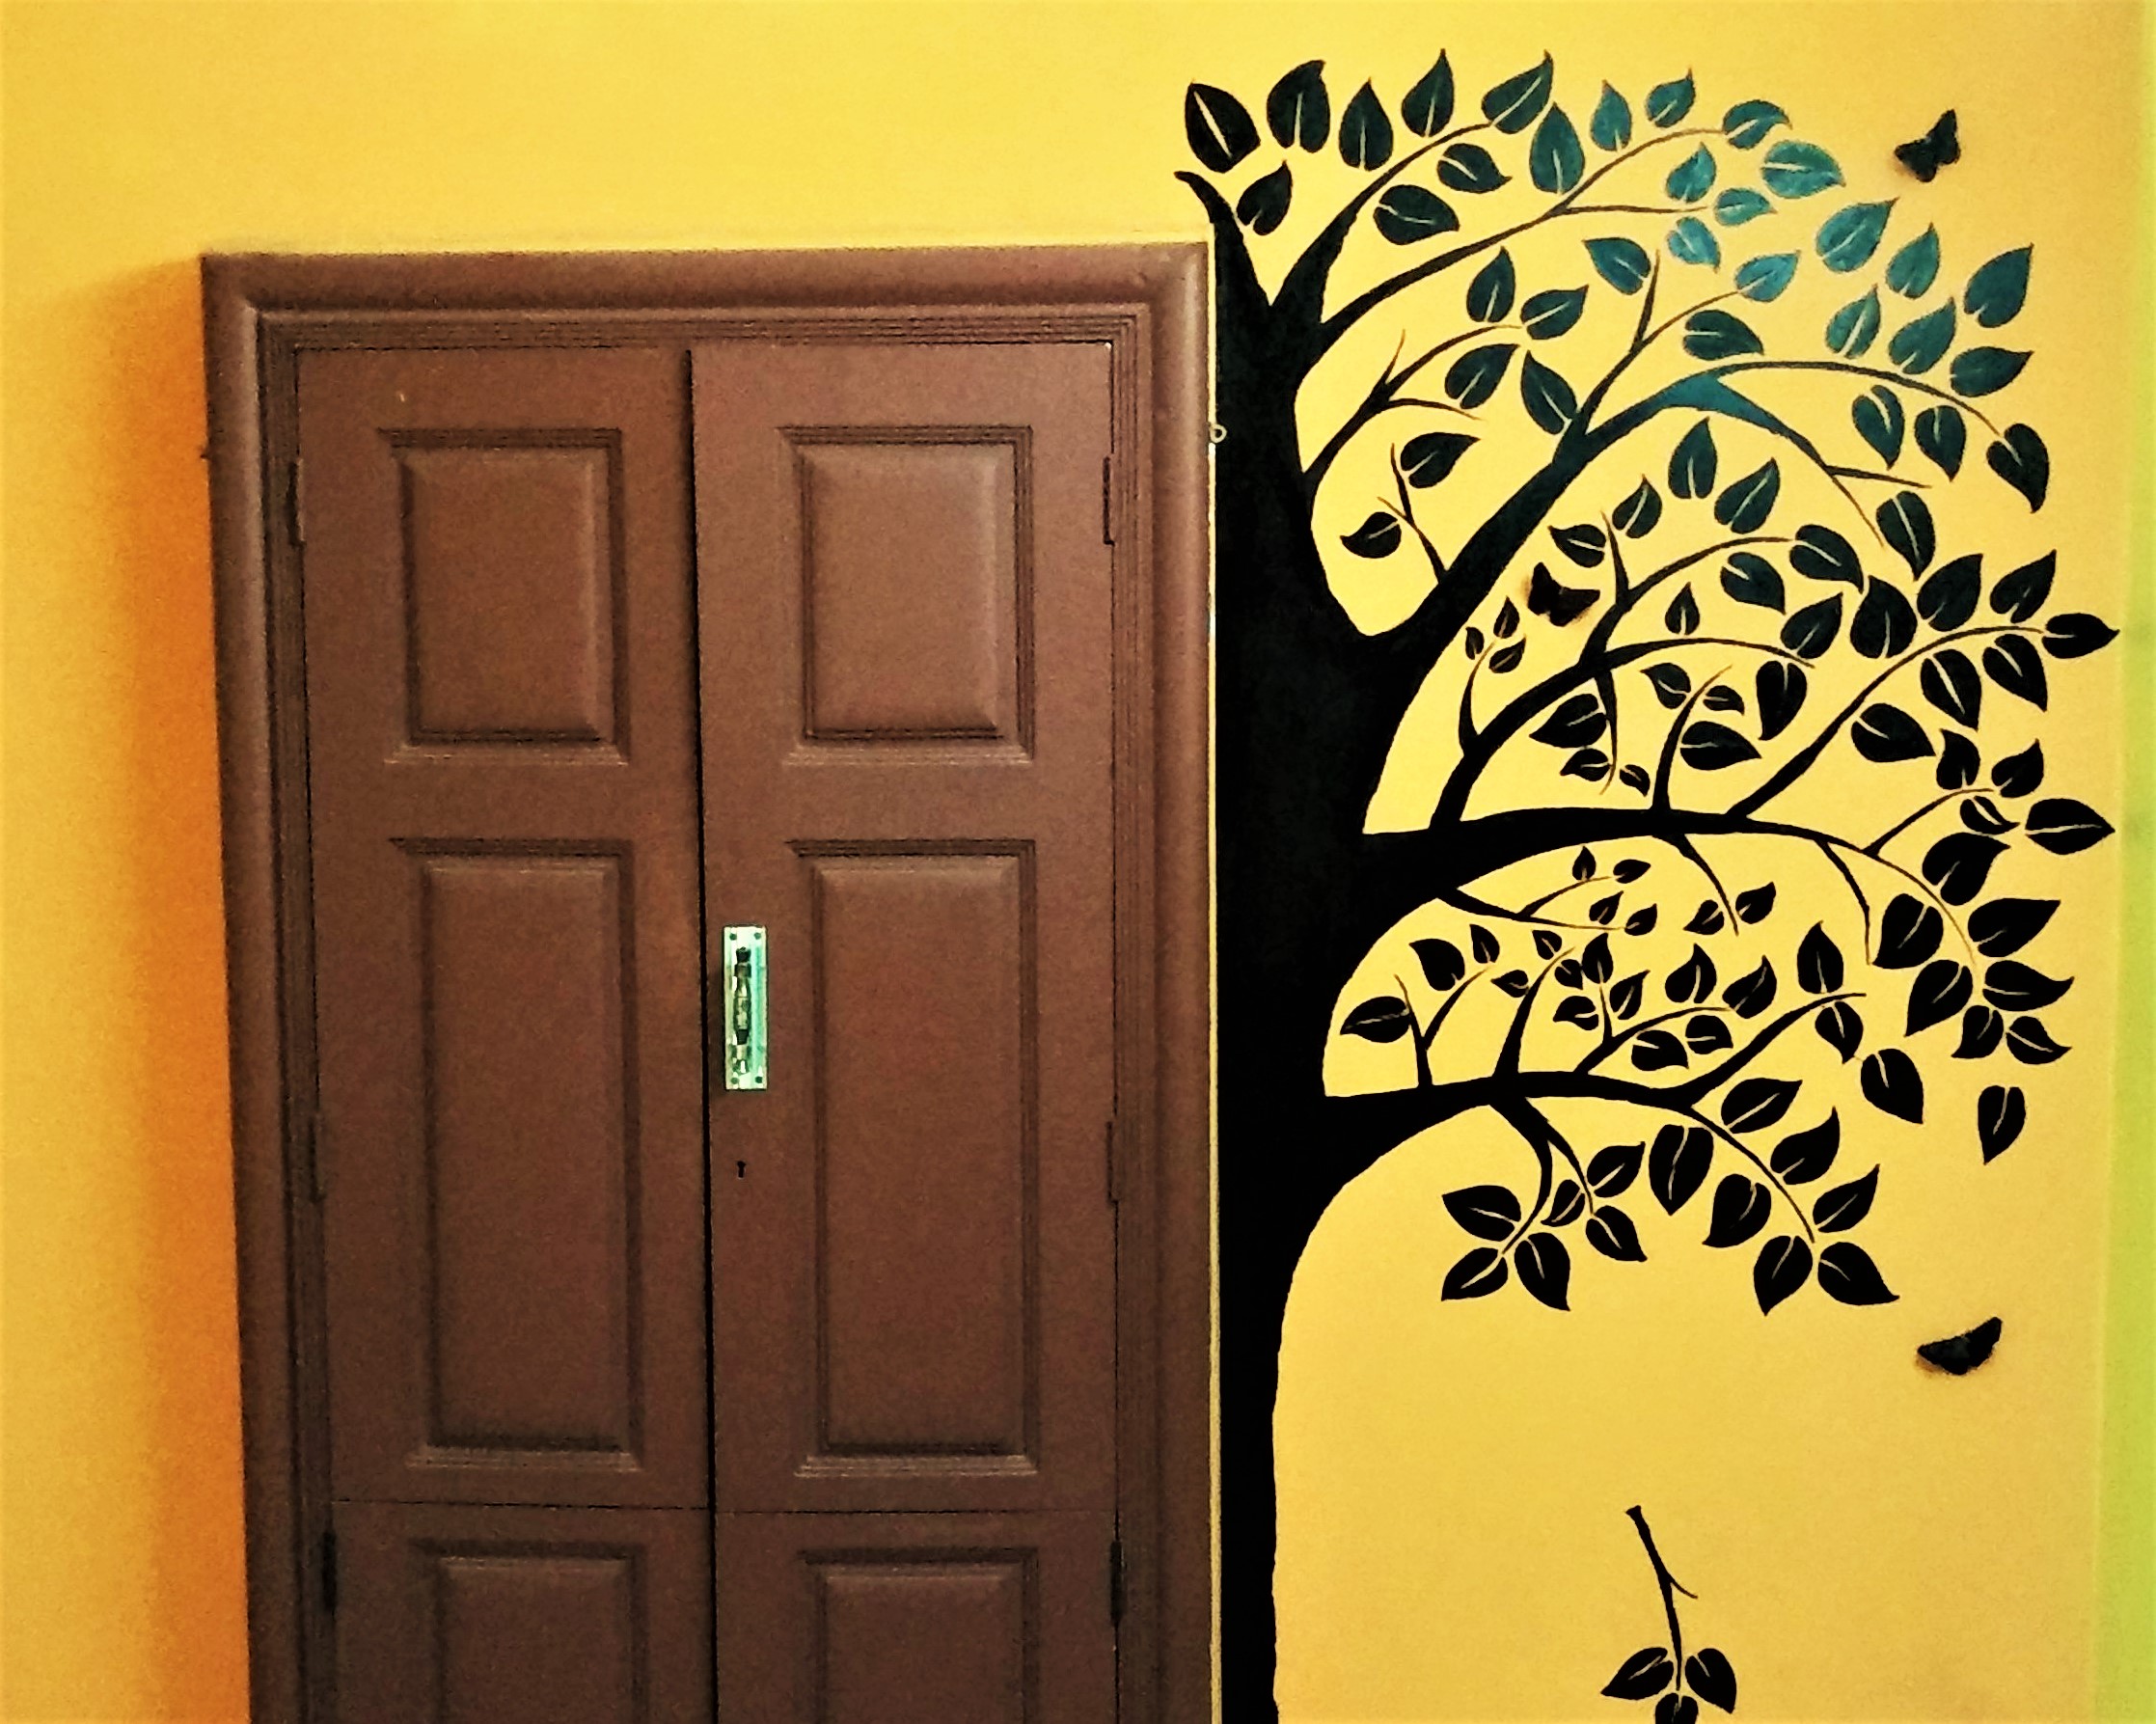
I chose the particular wall of my room because this orange wall looked dull and lifeless. Moreover, this is the place where I work, so I needed to be vibrant.

I particularly selected the left side of the wall and painted half tree from the cupboard.
-
PENCIL SKETCH
First sketch your image/tree as you wish, using pencils. This will help our guidelines when we start to paint. Or you can directly paint.

I sketched very lightly because if I make mistakes or got any idea, we can erase and correct easily.
-
CARDBOARDS
When coming to leaves, I wanted the tree to have symmetrical leaves. So, I used the cardboard as stencils. Since it is a DIY, we can customize the shape as our wish.

Here are the stepwise instructions of how I made simple DIY stencils or leaf blocks.
Step 1: First draw a rough shape of the leaf in a cardboard. You can use the real leaf for reference or freehand sketch.

Step 2: Once you approve your leaf shape, cut out the leaf part using scissors.

Step 3: (Optional) You can also cut off the leaf margin, using X-acto precision knife.

Step 4: Arrange the leaves based on the size and shape.

Step 5: Mark the leaf cutouts using numbers based on the shape. This numbering can help you later while drawing leaves.

Once the leaf stencils are ready, start using them as guides and draw the leaves along the branches of your tree.

Trace out the leaves with the bigger leaves at the bottom of the twig/branches and smaller leaves in the upper part.

Once you complete tracing out, start your outline part. Leave the vein part. I wanted it more precise, so instead of outlining with paint, I used a marker.

-
MARKERS
For precise leaf veins, I used black markers. You can also paint leaf veins using a small brush.

Instead all this, you can completely paint with one color and later after the paint dries, you can draw the veins and margins with contrasting color.
-
COMPLETE OUTLINES
In case, if you choose a single color like I did, before filling, try to complete outlines. This will help to prevent confusion.

This is the look after completing the outline of the branches and trunk of the tree.

This following look is after finishing the leaves. And the complete outlined look of a tree.

-
TIME TO PAINT
Now fill the image with the color, you preferred. I liked my wall to have a single color, So straight picked black paint. I chose acrylic colors as it is fast drying. You can choose whatever paints you want.

Initially, I painted branches and trunk. After completing, it looked so nice to leave to as it is. But went on painting the leaves too.

While painting the leaves, I preferred to leave the margin as it is, without filling. As I love that look. It highlights the leaves very well.


-
EXTRA DETAILS
I preferred adding details to the tree like
- birds nest
- birds silhouette
- owl
- birds cage, etc
But I finally, chose a falling twig. It is so attractive and simple.

The final look of the twig after completing outline and filling. Comment below if you like it or have any other ideas.

In the bottom, instead of leaving plain trunk, I drew grass around it. So as a whole the tree looked pleasant and lovely.

-
EMBELLISHMENTS
In addition to these extra details, you can also add embellishments you like. I used the color papers to make origami butterfly and added.

These butterflies are simple to make and added 3-dimensional effect to this embellishment. Stay tuned for the next post, to learn how to make these simple and easy DIY butterflies.

Origami butterfly – how to make butterflies?
HOW I USED THESE BUTTERFLIES?
To attach these butterflies to the wall, you can use a hot glue gun, the glue that you prefer. Here, I used double-sided foam tape.

I neatly cut the tape into the desired size and attached inner side of the butterfly.


Then I pressed the butterfly on the wall with little pressure. Then it all set.


CONFUSION PREVAILED
COLOURED VS BLACK COLOUR
One of the biggest confusion I had was, Choosing the color of the butterfly. Colored OR BLACK? Comment below which you liked the most!! I tried both of them and here are the pictures.


Since I chose a monochromatic tree, I thought same colored butterfly will suit well.

You can also include realistic butterflies for more attraction. If you are interested in making realistic butterflies then click here: realistic ones!

FINAL LOOK
This is the final look of my work. I am happy with how it came. Can you spot 3 butterflies in the tree?

Do try this simple DIY wall art. If you hesitate to use walls, then try in a canvas or a paper anything you prefer. Also let me know your art by sharing on Facebook, Instagram with #diarytaleart. So that I can see what you came up with.
If you have any queries or liked my work, feel free to leave a comment.
If you are interested in my previous wall art post, then click here: Wall art on a budget.

*NOTE: SUBSCRIBE us to get a FREE printable stencil of the leaf ( shape – I used in my tree). Once you subscribed, you will get a PDF document in your inbox within a day or two. Make sure you subscribe soon!!
good work great information thanks for sharing
Glad you liked it!
I have no words to describe… It’s so so so amazing and sooper cool.. Definitely am gonna try this in my room… ❤ #keep going.. Expecting more and more Diys..❤🎈
Thanks for your love @ashwathi. Do try it out! Make sure you share with me!
Really impressive and Admirable work.
Best wishes to the author.
Thanks and regards.
Thank you so much! @vivasayi
i luv this painting!!!nice job preethi
thanks @srinithi 🙂
startling work!!!!!!!!
Thanks @swathi!! I appreciate your response ji!!
SUPER cool art loving it😘😘😘keep up👍🏻👍🏻👍🏻👏🏻👏🏻👏🏻
Thanks @ lawan. Glad you liked it!
a really beautiful painting…..very easy too!!!great work…..hoping to see many more painting from you
Thanks! @ vaishnavi do try it!! It is definitely more fun.
Superb work preethi!!!!!!keep gng
Thanks anu!
Amazing art
Thanks @vinoth