
In my childhood, I used to keep watching at the people who would pack our things in supermarkets or any other shops. Especially I like to see them use their rubber stamp, as soon as they receive our bills to stamp, “Paid”. They will do it in an unfashionably fast manner, to keep up with the queue of customers waiting. From then on, I would like to have my own stamps to play with. But I didn’t get a chance. So, now after many years, I made my own stamp and I found myself rejoicing over the sweet memories I had with the stamp. And yes, in this blog post, I am going to share how I made my own stamp (with detailed instructions) using simple tools I found in my craft box. So let’s get started.

STAMPS / STAMPING
Stamping is a kind of art where an image or pattern is carved on a rubber block or a sheet of rubber. This carved rubber is placed on a wooden block or acrylic board for easy handling. Then a fresh coat of ink, paint or pigment is applied to the carving. This paint or ink loaded carved rubber is then pressed on a paper or other surface like wood, fabric, etc to impress the design on them.

HOW TO MAKE A CUSTOM STAMP?
We can make our own stamp using many different ways. In today’s post, we are going to see how to make a stamp using erasers, which you can easily find in your pencil case, craft box or stationery shop near you.
Required materials –
To make a stamp, we require very simple tools as follows.

- Rubber/Eraser
- X-Acto knife
- Pencil
- Inkpad
- Paints
- Brush
- Paper,
- Scale, and scissors.
To make it easier, I have added the Amazon link to each product. You can use it or you can find them in your local art store.
STEPS TO MAKE A STAMP
If you guys like watching videos for tutorials, here is it. You can also watch all our videos on youtube and follow us there. Blog readers, scroll down to continue reading!
Step 1 – ERASERS
If you are thinking of a smaller design, then a small eraser is enough. In case, if you have any big designs or patterns in mind, go for a rubber sheet or rubber slab.

Take an eraser and place it on a paper. Draw an outline or a box around it. Now, this the size or frame of our design.


Other options alternate to erasers.
We can use the following materials in the place of erasers to make a stamp.
- Potatoes
- Foam sheet
- Sponge
- Cardboard paper roll
Step 2 – STAMP DESIGN
For stamp design, you can choose whatever designs you want. If you are just starting out, try some basic designs like triangles, flags, squares, alphabets, etc. If you procured a good result in basic designs, then try some designs with more details in it.

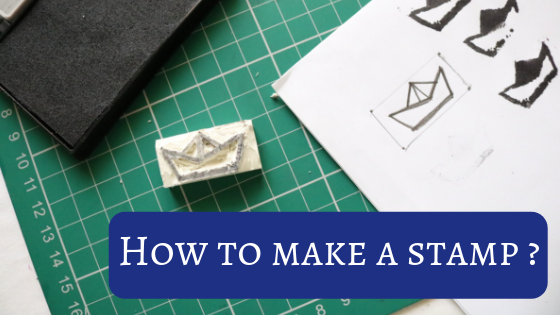
Now, draw a simple design, that fixes inside the box/frame drawn. In this case, I am going with a boat. Draw this boat inside the frame. Once your design is finalized, using a pencil, darken the outlines and details.
Step 3 – TRANSFERING DESIGNS TO ERASERS
Now to transform this design to the eraser, we have two options. They are
- Directly draw the “MIRROR IMAGE” of the design on the eraser.
- Place the eraser over the design and gently press it.

In this case, I’m choosing the second option. As soon as I darkened the design using a graphite pencil, I placed the eraser over the boat and I pressed a little hard. The design got easily transferred to the eraser.

Step 4 – CARVING PART
Take an X-Acto knife and start carving. Gently cut away the eraser around the stamp design so that the design will be raised.

Cut as close to the design as possible, to get the accurate result. Be careful, while using the sharp knife, especially carving. If you lose control, it will slit you.

In this post, we made a stamp using just an X-Acto knife. In case you are looking to make stamps professionally, there are a lot of stamp making kits and tools available online. Try them to make some professional stamps.
Step 5 – TESTING
After you are done with carving, remove all the extras and do a test by damp the eraser on the inkpad and stamp on a rough paper.
If you are good with the result, then voila. You made a stamp. If you are not satisfied with the result, tweak it again, till you get your design right.
STAMPING
Now that the stamp is done, let’s do the fun part. I am going to experiment stamping using ink and acrylic paints. Let’s see how each medium produces the result.
STAMPING USING INKS & INKPADS
For ink version, I chose black inkpad. Place the stamp on the stamp pad and gently press it to load the ink.

Now place the stamp on a paper or cardstock to impress your design.

STAMPING USING ACRYLIC PAINTS

I used some acrylic paints to make a colorful print on paper. I loved the result. It goes well with acrylic paints.

Just pour some paint in a tray or plate.

Gently place the stamp on the plate or apply the paint on the stamp using a brush.

The stamp is now freshly loaded with paint and ready to print.

CLEANING STAMPS.
To clean your stamps from excess ink or paint, wipe the stamp using a tissue. Clean or dry your stamp before using it again with other colors, esp with paints. This will avoid the muddy result.

Customize Your Stamps.
You can always customize your stamps with your own designs and try using your favorite mediums like acrylics or pigments.
You can add a wooden block, glass or acrylic board to the eraser to make it easy to handle.

I hope you like this simple tutorial on how to make your own stamp. If you like this post or have any questions, do write to us in the comment section below. Share it your friends, family, and kids, who love DIY crafts to try this summer and make some cool designs and patterns.
Do follow us on social media and share your work with us by tagging us.
- Instagram – @diarytale
- Youtube – Diarytale
- Twitter – @diary_tale
- Pinterest – diarytaleDT
- Facebook Page – @diarytale1
*P.S. Thanks for those who showed continuous support via subscriptions & in social media.
Have a good day!
This is very interesting!!
Yes, it is! Thanks for reading!!